


Isometric exercises like wall sits, planks, and glute bridges hold the body in one position for a set period of time. Muscles are contracted and engaged, but they don’t lengthen during the exercise.
Isometric training is a way to categorize exercises that recruit muscles and exert tension without lengthening (eccentric contraction) or shortening (concentric contraction) the muscle.
These are exercises in which your muscles are engaged but not moving. They’re a static way of placing demand on a desired muscle or group of muscles without muscle or joint movement.
For example, when you hold an isometric position like a plank, you’re contracting the muscles in your core, legs, and upper body to hold yourself up while remaining in the same position.
Contrarily, in an exercise like a biceps curl, where you lift and lower your hand as the elbow bends, the biceps muscle gets shorter when your hand moves toward your shoulder and longer as you straighten your arm back out.
Isometric exercises are
They can also be a great way to exercise if you have limited space or you simply want to add variety to your current workouts.
Keep reading to discover eight isometric exercises.
Wall sits focus on improving the strength in your thighs, specifically your quadriceps muscles.
Equipment needed: none
Muscles worked: quadriceps, hamstrings, and glutes
- Stand about 2 feet away from a sturdy wall, leaning your back against it.
- Bend your knees and lower your bottom down so that your knee joints form a 90-degree angle. Your body position should resemble the same posture you have when sitting in a chair.
- Hold this position for 15 seconds or longer. Keep your hips and shoulders in contact with the wall and keep your knees over your ankles.
- Perform 2 to 3 sets.
To maintain this position, you’ll feel your thighs becoming tighter and more fatigued.
Experiment with switching between driving your weight down through your toes and your heels. Driving down through your heels will target your glutes, while driving down your toes will target your quadriceps.
Just be sure not to let your knees go out past your toes, and when you put weight on your toes, don’t put too much pressure on the knees.
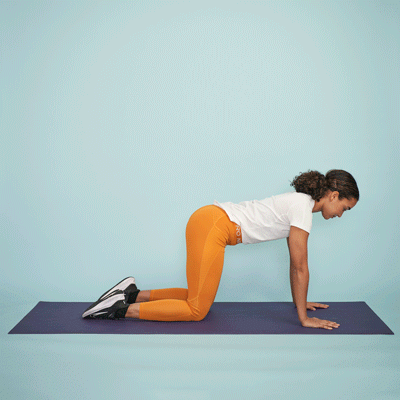
The straight arm plank hold is an effective way to engage many muscles in your body.
Equipment needed: none; yoga mat optional
Muscles worked: abdominals, quadriceps, glutes, arm muscles, chest, and shoulders
- Start in a kneeling pushup with your hands shoulder-distance apart.
- Push your hands into the ground and straighten your knees, pushing down into the balls of your feet to raise your body into a high plank position. Your body should look like it’s in the upward position of a pushup.
- Hold this position 20 to 60 seconds, or as long as you can maintain proper form. Repeat two more times.
During the exercise, ensure your hands and shoulders are aligned, your legs are straight, and your core is engaged.
The side plank is excellent for engaging your obliques, located on the sides of your midsection.
Equipment needed: none; yoga mat optional
Muscles worked: obliques, spinal stabilizers, quadriceps, glutes, shoulder stabilizers, hip abductors
- Lie on your left side with your legs straight, keeping your hips, knees, and feet stacked. Bend your left elbow and place your forearm on the ground under your shoulder.
- Push your left forearm into the ground to lift your torso and hips off the ground. Keep your core tight and ensure you’re making a straight line from head to heel.
- Lift your right arm straight into the air, or keep it by your side.
- Hold this position for 10 or more seconds. Then, switch sides.
If you’d like a bigger challenge, try the side plank with the bottom arm straight.
Technically, you can make most exercises isometric exercises by holding your body still during the contraction. Here’s what we mean, using the squat as an example.
Equipment needed: none
Muscles worked: quadriceps, glutes, hamstrings
- Stand with your feet slightly more than hip-width apart. Your toes may be pointed slightly out, if it’s more comfortable, with your hands on your hips or held straight out in front of you.
- Slowly push your hips back into a sitting position while bending your knees. Avoid driving your knees forward.
- Continue to lower yourself until your butt is slightly below knee level. If you can’t go further, lower yourself until your thighs are parallel to the floor. Keep your feet planted with heels down, and your spine long without rounding forward.
- Hold this position for 10 to 30 seconds. Then, return to the starting position.
- Perform 3 to 5 sets.
Overhead holds challenge the muscular endurance of your shoulder girdle. They’re similar to an overhead shoulder press, but instead of bringing the weight back down, you hold it up.
Equipment needed: light to medium weight required (start with a 2- to 10-pound dumbbell in each hand, then increase the weight as needed)
Muscles worked: upper trapezius, shoulder girdle muscles, chest, triceps, core
- Stand with your feet shoulder-width apart, and hold each weight in your hands by your shoulders.
- Press the weight up above your head, extending your arms and holding the weight steady. Be sure to engage your core.
- Keep your arms fully extended and in line with your shoulders.
- Hold the weight over your head for 20 to 30 second intervals. However, stop before this if you’re concerned you may drop the weight.
- Perform 2 to 3 rounds.
Glute bridges are a great exercise for increasing the strength and muscle in your backside.
Equipment needed: none; yoga mat optional
Muscles worked: hamstrings and glutes, core muscles
- Lie on your back with your knees bent and your arms by your sides. Your heels should be 12 to 16 inches from your butt.
- Press into your heels, brace your core, and push your pelvis upward by squeezing your glutes. Ensure your ribs don’t flare during this movement. Keep your tailbone slightly tucked, abdominals engaged, and feet flat on the floor.
- You will feel your glutes and hamstrings starting to fatigue. Resist the urge to let your hips sink or your back arch.
- Complete 2 to 3 sets of a 30-second each.
The V-hold helps you work on your core stability while also developing core strength.
Equipment needed: none; yoga mat optional
Muscles worked: abdominals and hip flexors
- Lie back with your legs straight, shoulders pressed down, and arms in the air.
- While engaging your core, raise your legs off the floor and reach up with your arms, creating a “V” shape with your body and legs. You can keep your arms by your side to make the exercise easier.
- If maintaining a straight-leg position makes it hard to keep your spine long or causes your hip flexors to work overtime, bend your knees slightly in order to lengthen your back and engage the abdominals more.
- Hold this position for 15 seconds, or as long as you can while maintaining proper form.
- Perform 2 to 3 sets.
During the exercise, make sure to keep your back straight and avoid rounding your shoulders. Continue breathing throughout the exercise.
The calves are commonly forgotten, but are important to help enhance lower body power, improve overall athletic performance, and increase balance and stability.
Instead of doing regular calf raises, in which you move up and down, in this exercise, you’ll hold the top position of the calf raise.
Equipment needed: none; light weight to make it harder optional, or a chair or wall for support optional
Muscles worked: calves (gastrocnemius, soleus)
- Stand with your feet hip-distance apart. For support, you may wish to stand about 2 feet from a wall.
- With your hands on your hips (or resting lightly against a wall for support), push into the balls of your feet and lift your heels off the ground.
- Hold this position for 20 to 30 seconds.
- Perform 2 to 3 rounds.
For an added challenge, try doing this on one foot. Then switch sides.
Consider trying the following tips to maximize muscle tension and prevent injury when performing isometric exercises:
- Focus on good form: Once you can no longer perform the exercise with proper form, the exercise is done.
- Actively contract your muscles: As you perform the exercise, pay attention to your muscles contracting. This will help ensure proper form and better muscle activation, allowing for greater strength and endurance gains.
- Breathe: It’s common to forget to breathe during isometric exercises. Make sure you’re breathing throughout the entire exercise.
- Don’t overdo it: It may be tempting to hold a position for as long as you can, especially if you’re new. But this can be very taxing on the body and may lead to injury. Instead, prioritize proper form.
If an exercise doesn’t feel right for you, then it’s probably best to skip it. If you’re recovering from an injury, always listen to the advice from a physical therapist, doctor, trainer, or other healthcare professional.
Yes, isometric exercises may be beneficial for older adults because they can help improve muscle strength without putting too much pressure on the joints.
A 2015 study found that performing isometric exercises 3 times weekly for 12 weeks helped improve posture and walking gait, including speed and stride length.
Yes, some research suggests that isometric exercise may be an effective tool for managing high blood pressure and even lowering it.
That said, if you have high blood pressure, it’s best to speak with your doctor about isometric exercises. They can help develop the best training program for you.
In the past, healthcare professionals were more reluctant to prescribe isometric exercises to people with high blood pressure because blood pressure may increase during the contraction phase of an exercise.
As such, people with high blood pressure or heart disease may wish to exert caution when performing these exercises or doing so in a supervised setting.
However, on the whole, isometric exercises aren’t contraindicated for specific populations, so it’s best to speak with a healthcare professional or physical therapist if you’re unsure whether they’re appropriate for you.
Isometric exercises are designed to hold your body in a position for a set period of time, which can help build muscular strength and endurance.
They may be ideal for people seeking low impact exercise, have limited space, are recovering from an injury, or are looking for a different kind of fitness challenge.
Always remember that these exercises can be adjusted to suit your current level of fitness. For example, if 20-second planks are too challenging, bump it down to 10 seconds and then build up as you get stronger over time.